Images#
Learn how to generate images with Xinference.
Introduction#
The Images API provides two methods for interacting with images:
The Text-to-image endpoint create images from scratch based on a text prompt.
The Image-to-image endpoint allows you to generate a variation of a given image.
API ENDPOINT |
OpenAI-compatible ENDPOINT |
|---|---|
Text-to-Image API |
/v1/images/generations |
Image-to-image API |
/v1/images/variations |
Supported models#
The Text-to-image API is supported with the following models in Xinference:
sd-turbo
sdxl-turbo
stable-diffusion-v1.5
stable-diffusion-xl-base-1.0
sd3-medium
sd3.5-medium
sd3.5-large
sd3.5-large-turbo
FLUX.1-schnell
FLUX.1-dev
Kolors
hunyuandit-v1.2
hunyuandit-v1.2-distilled
cogview4
Qwen-Image
Image-to-image supported models:
Flux.1-Kontext-dev
Qwen-Image-Edit
Quickstart#
Text-to-image#
The Text-to-image API mimics OpenAI’s create images API. We can try Text-to-image API out either via cURL, OpenAI Client, or Xinference’s python client:
curl -X 'POST' \
  'http://<XINFERENCE_HOST>:<XINFERENCE_PORT>/v1/images/generations' \
  -H 'accept: application/json' \
  -H 'Content-Type: application/json' \
  -d '{
    "model": "<MODEL_UID>",
    "prompt": "an apple",
  }'
import openai

client = openai.Client(
    api_key="cannot be empty",
    base_url="http://<XINFERENCE_HOST>:<XINFERENCE_PORT>/v1"
)
client.images.generate(
    model=<MODEL_UID>,
    prompt="an apple"
)
from xinference.client import Client

client = Client("http://<XINFERENCE_HOST>:<XINFERENCE_PORT>")

model = client.get_model("<MODEL_UID>")
input_text = "an apple"
model.text_to_image(input_text)
{
  "created": 1697536913,
  "data": [
    {
      "url": "/home/admin/.xinference/image/605d2f545ac74142b8031455af31ee33.jpg",
      "b64_json": null
    }
  ]
}
Image-to-image#
The Image-to-image API mimics OpenAI’s create image variation API. We can try image-to-image API out either via cURL, OpenAI Client, or Xinference’s python client:
curl -X 'POST' \
  'http://<XINFERENCE_HOST>:<XINFERENCE_PORT>/v1/images/variations' \
  -F model=<MODEL_UID> \
  -F image=@xxx.jpg \
  -F prompt="an apple"
import openai

client = openai.Client(
    api_key="cannot be empty",
    base_url="http://<XINFERENCE_HOST>:<XINFERENCE_PORT>/v1"
)
client.images.create_variation(
    model=<MODEL_UID>,
    image=open("image_edit_original.png", "rb"),
    prompt="an apple"
)
from xinference.client import Client

client = Client("http://<XINFERENCE_HOST>:<XINFERENCE_PORT>")

model = client.get_model("<MODEL_UID>")
input_text = "an apple"
with open("xxx.jpg", "rb") as f:
    model.image_to_image(f.read(), input_text)
{
  "created": 1697536913,
  "data": [
    {
      "url": "/home/admin/.xinference/image/605d2f545ac74142b8031455af31ee33.jpg",
      "b64_json": null
    }
  ]
}
Memory optimization for Large Image Models e.g. SD3-Medium, FLUX.1#
Note
From v0.16.1, Xinference by default enabled quantization for large image models like Flux.1 and SD3.5 series. So if your Xinference version is newer than v0.16.1, You barely need to do anything to run those large image models on GPUs with small memory.
Useful extra parameters can be passed to launch including:
--cpu_offload True: specifyingTruewill offload the components of the model to CPU during inference in order to save memory, while seeing a slight increase in inference latency. Model offloading will only move a model component onto the GPU when it needs to be executed, while keeping the remaining components on the CPU.--quantize_text_encoder <text encoder layer>: We leveraged thebitsandbyteslibrary to load and quantize the T5-XXL text encoder to 8-bit precision. This allows you to keep using all text encoders while only slightly impacting performance.--text_encoder_3 None, for sd3-medium, removing the memory-intensive 4.7B parameter T5-XXL text encoder during inference can significantly decrease the memory requirements with only a slight loss in performance.--transformer_nf4 True: use nf4 for transformer quantization.--quantize: Only work for MLX on Mac, Flux.1-dev and Flux.1-schnell will switch to MLX engine on Mac, andquantizecan be used to quantize the model.
For WebUI, Just add additional parameters, e.g. add key cpu_offload and value True
to enable cpu offloading.
Below list default options that used from v0.16.1.
Model |
quantize_text_encoder |
quantize |
transformer_nf4 |
|---|---|---|---|
FLUX.1-dev |
text_encoder_2 |
True |
False |
FLUX.1-schnell |
text_encoder_2 |
True |
False |
sd3-medium |
text_encoder_3 |
N/A |
False |
sd3.5-medium |
text_encoder_3 |
N/A |
False |
sd3.5-large |
text_encoder_3 |
N/A |
True |
sd3.5-large-turbo |
text_encoder_3 |
N/A |
True |
Qwen-Image |
text_encoder |
N/A |
False |
Qwen-Image-Edit |
text_encoder |
N/A |
False |
Note
If you want to disable some quantization, just set the corresponding option to False.
e.g. for Web UI, set key quantize_text_encoder and value False
and for command line, specify --quantize_text_encoder False to disable quantization
for text encoder.
For CogView4, we found that quantization has a significant impact on the model.
Therefore, when GPU memory is limited, we recommend enabling the CPU offload option in the Web UI,
and specifying --cpu_offload True when loading the model via the command line.
GGUF file format#
GGUF file format for transformer provides various quantization options.
To use gguf file, you can specify additional option gguf_quantization for web UI,
or --gguf_quantization for command line for those image models which support
internally by Xinference. Below is the mode list.
Model |
supported gguf quantization |
|
|---|---|---|
FLUX.1-dev |
F16, Q2_K, Q3_K_S, Q4_0, Q4_1, Q4_K_S, Q5_0, Q5_1, Q5_K_S, Q6_K, Q8_0 |
|
FLUX.1-schnell |
F16, Q2_K, Q3_K_S, Q4_0, Q4_1, Q4_K_S, Q5_0, Q5_1, Q5_K_S, Q6_K, Q8_0 |
|
sd3.5-medium |
F16, Q3_K_M, Q3_K_S, Q4_0, Q4_1, Q4_K_M, Q4_K_S, Q5_0, Q5_1, Q5_K_M, Q5_K_S, Q6_K, Q8_0 |
|
sd3.5-large |
F16, Q4_0, Q4_1, Q5_0, Q5_1, Q8_0 |
|
sd3.5-large-turbo |
F16, Q4_0, Q4_1, Q5_0, Q5_1, Q8_0 |
|
Qwen-Image |
F16, Q3_K_M, Q3_K_S, Q4_0, Q4_1, Q4_K_M, Q4_K_S, Q5_0, Q5_1, Q5_K_M, Q5_K_S, Q6_K, Q8_0 |
|
Qwen-Image-Edit |
Q2_K, Q3_K_M, Q3_K_S, Q4_0, Q4_1, Q4_K_M, Q4_K_S, Q5_0, Q5_1, Q5_K_M, Q5_K_S, Q6_K, Q8_0 |
|
Qwen-Image-Edit-2509 |
Q2_K, Q3_K_M, Q3_K_S, Q4_0, Q4_1, Q4_K_M, Q4_K_S, Q5_0, Q5_1, Q5_K_M, Q5_K_S, Q6_K, Q8_0 |
|
Note
We stronly recommend to enable additional option cpu_offload with value True for WebUI,
or specify --cpu_offload True for command line.
Example:
xinference launch --model-name FLUX.1-dev --model-type image --gguf_quantization Q2_K --cpu_offload True
With Q2_K quantization, you only need around 5 GiB GPU memory to run Flux.1-dev.
For those models gguf options are not supported internally, or you want to download gguf files on you own,
you can specify additional option gguf_model_path for web UI or spcecify
--gguf_model_path /path/to/model_quant.gguf for command line.
Lightning LORA Support#
Lightning LORA performs distillation on models in the form of LoRA, reducing the number of inference steps while maintaining model performance, and significantly speeding up inference. The following models currently support this LoRA:
Model |
Supported lightning version |
|
|---|---|---|
Qwen-Image |
4steps-V1.0-bf16, 4steps-V1.0, 8steps-V1.0, 8steps-V1.1-bf16, 8steps-V1.1 |
|
Qwen-Image-Edit |
4steps-V1.0-bf16, 4steps-V1.0, 8steps-V1.0-bf16, 8steps-V1.0 |
|
Qwen-Image-Edit-2509 |
4steps-V1.0-bf16, 4steps-V1.0-fp32, 8steps-V1.0-bf16, 8steps-V1.0-fp32 |
|
4 steps or 8 steps refer to the inference steps (num_inference_steps).
When lightning_version is specified, Xinference will automatically set the number of inference steps.
When using it, select the lightning version in the interface, or specify it via the command line.
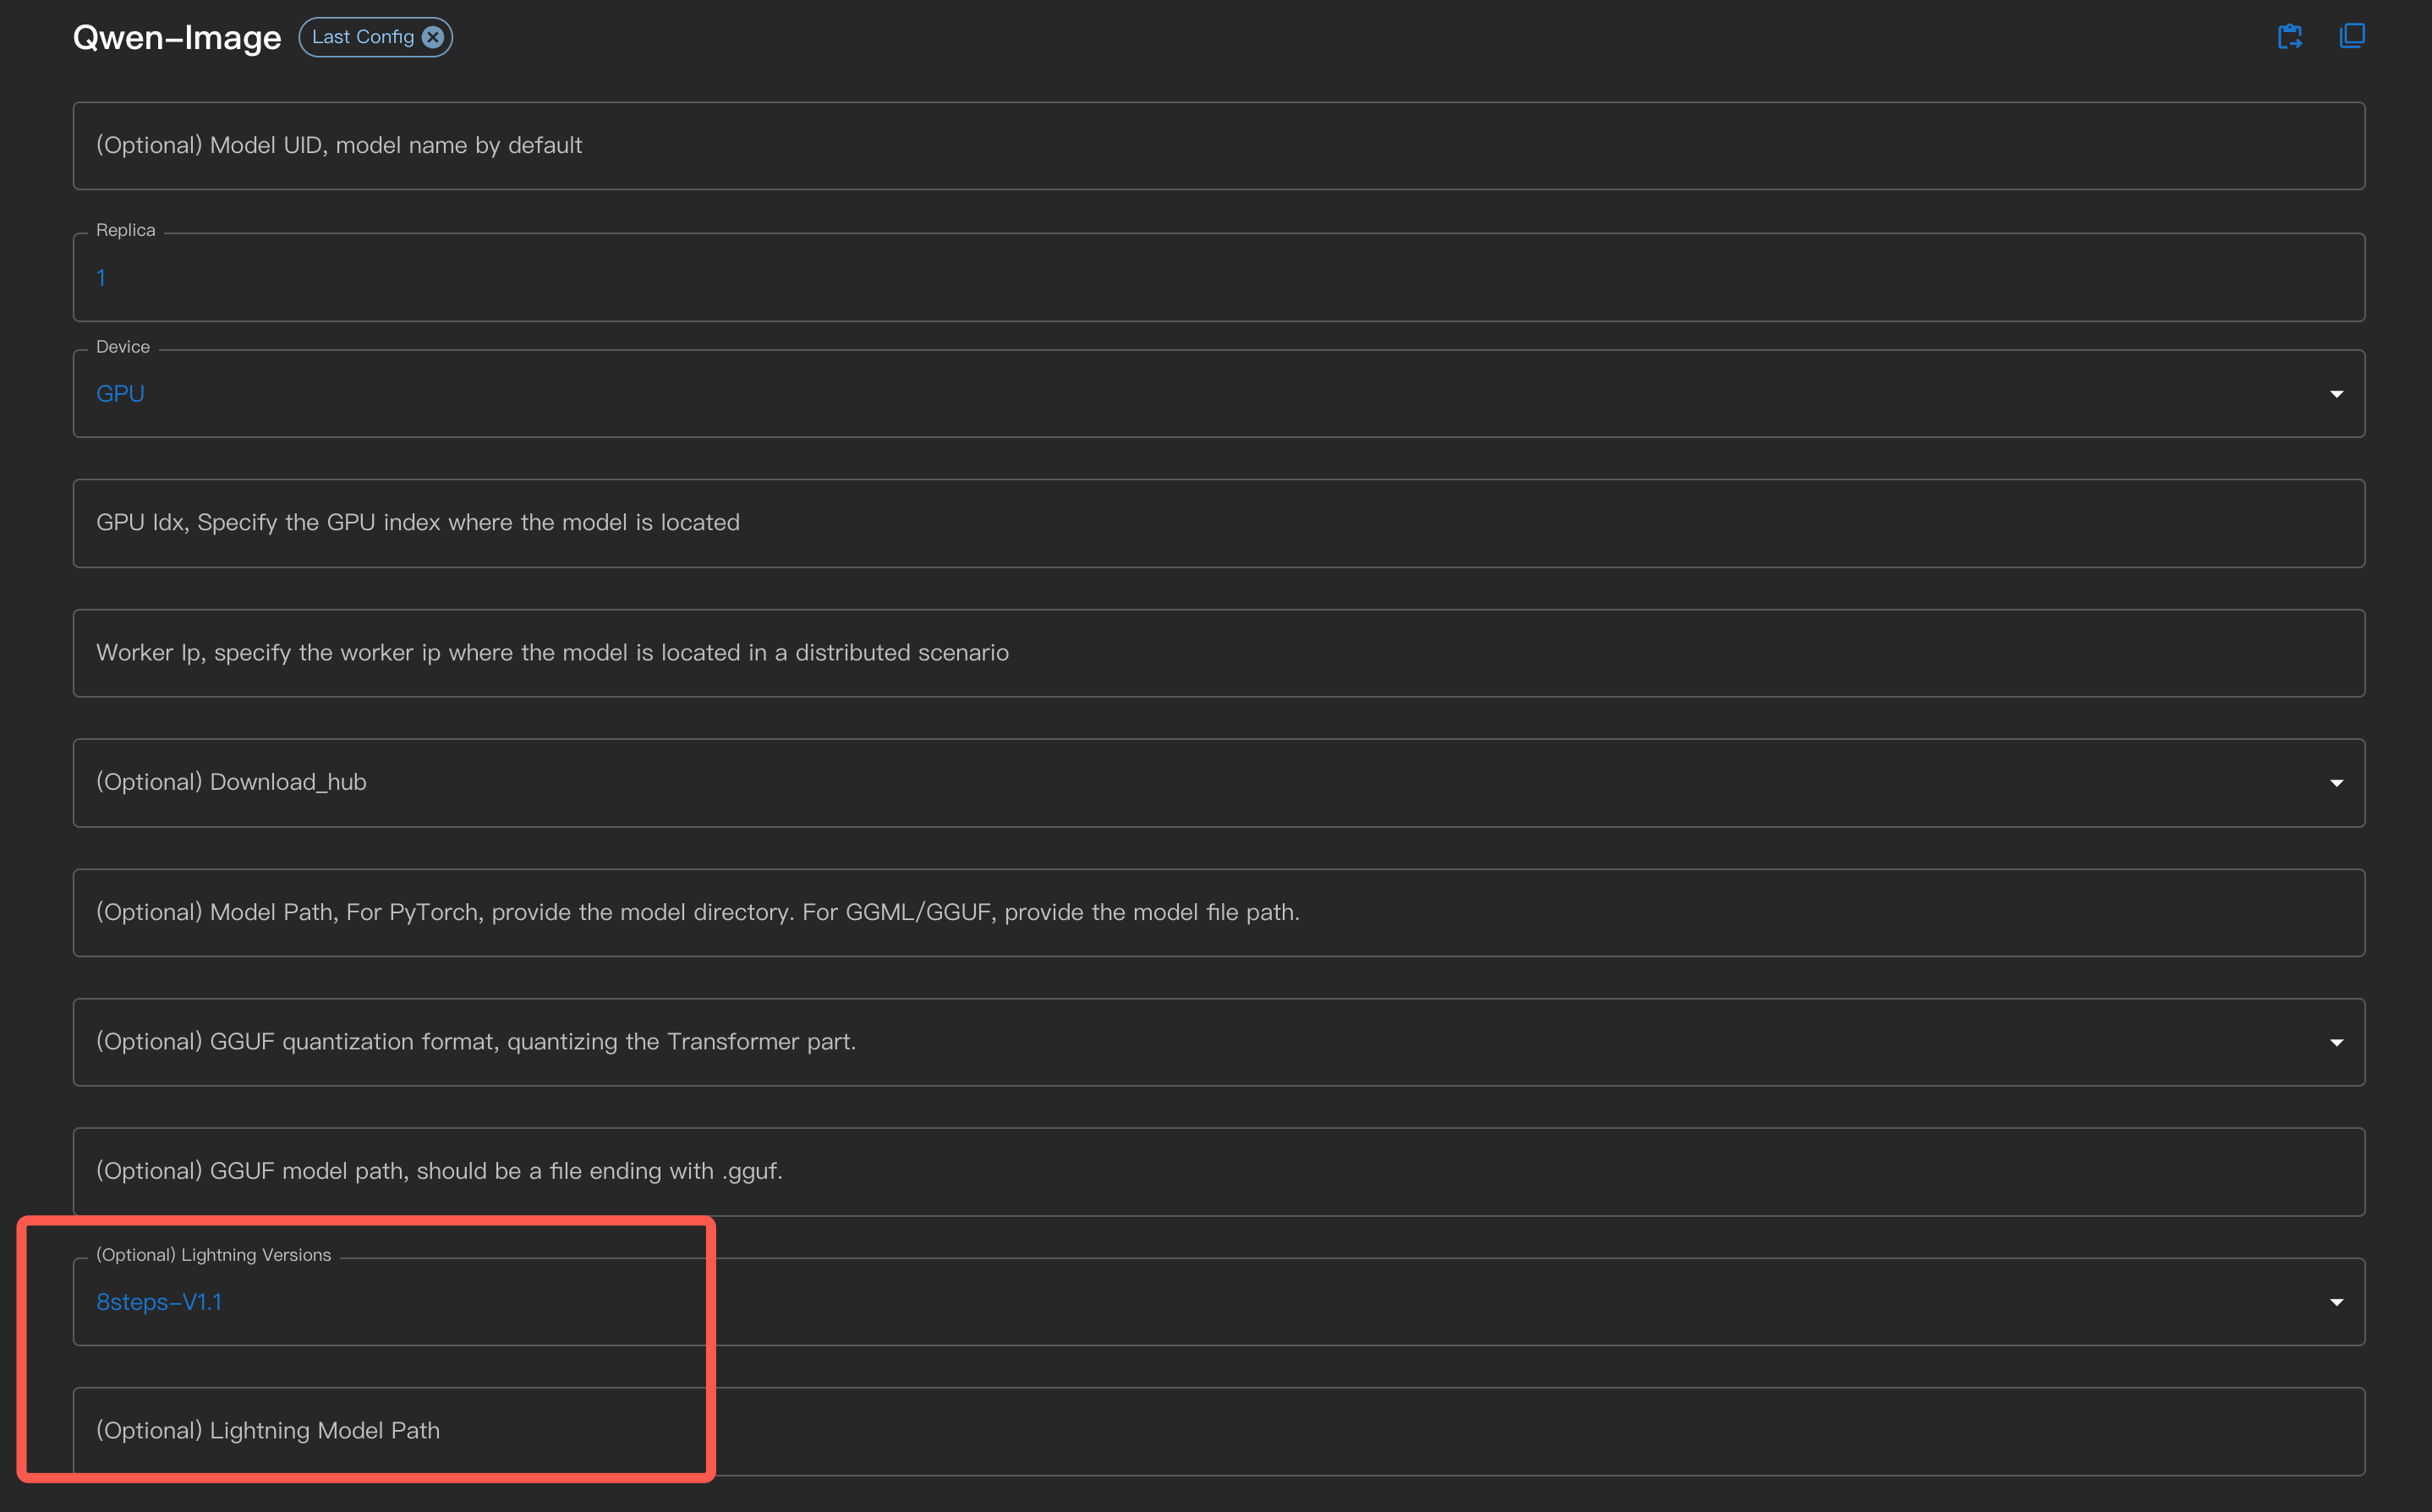
Use the command line with --lightning_version <version>.
For those who have downloaded the lightning LoRA files themselves, you can specify them via the Lightning
Model Path in the interface or by using the command line option --lightning_model_path.
For example, using 4steps-V1.0, the inference time is reduced from the original 34s to 3s.
OCR#
The OCR API accepts image bytes and returns the OCR text.
We can try OCR API out either via cURL, or Xinference’s python client:
curl -X 'POST' \
  'http://<XINFERENCE_HOST>:<XINFERENCE_PORT>/v1/images/ocr' \
  -F model=<MODEL_UID> \
  -F 'kwargs={"model_size":"large"}' \
  -F image=@xxx.jpg
from xinference.client import Client

client = Client("http://<XINFERENCE_HOST>:<XINFERENCE_PORT>")

model = client.get_model("<MODEL_UID>", model_size="large")
with open("xxx.jpg", "rb") as f:
    model.ocr(f.read())
<OCR result string>